Before you set off to do your filming, try reading our post on how to use video.
The following guidance is used by the DH digital team to produce video and train colleagues in the Department on the process of filming, editing and sharing.
Filming
- Speedy turnaround is key to keeping your video relevant: keeping your video simple means faster editing and quicker publication
- Always hold the camera the right way up (with the screen landscape)
- Hold the camera with both hands and keep your elbows tucked in – this will provide you with better stability than holding the camera out in front of with one hand
- Try and visualise the shots that you’re going to shoot and, at the very least, try to have a rough script for the whole film: film-makers story-board their productions for a reason
- Remember to get the name and job title of every person you film – which should be done on-camera and, ideally, in writing to ensure that the correct spellings are used
- Ensure that anyone taking part is clear what the footage will be used for and where (DH.gov.uk, YouTube, etc.) and that they’ve agreed to this – you could also record this with the camera.
- Go somewhere quiet – background noise is much more noticeable on film
- Go somewhere well-lit and don’t have bright light behind the speaker
- Don’t speak yourself, unless you specifically want to include your own voice, e.g. in an interview situation, and make sure that the person you’re interviewing doesn’t speak over you, or vice-versa – this is very, very difficult to edit out
- Don’t stand too close to the person that you’re filming – their features will be distorted and will give a “fishbowl” effect
- Try to keep the camera lens at your subject’s eye-level: try not to shoot up- or downward onto them
- Watch out for reflections, if your subject is in front of glass you’ll probably be caught on camera
- When your subject has finished speaking, leave the camera running and stable for a second or two to make your edits easier
- Stop recording before you move the camera, it avoids cutting off the end of the clip
Editing
Essential free software:
- Windows Movie Maker (For editing your videos)
(Should be bundled with Windows XP, but can be downloaded separately) - Prism Convertor (for converting the camera files to ones compatible with Windows Movie Maker)
Optional software:
- Super © - Media Convertor (AVI and MOV > MP3 – Advanced technique) The download link is right at the bottom of their page
Using Prism Convertor (MOV > AVI) to convert your video files
Windows Movie Maker can be very picky about the file formats that it will play and edit, so you need to convert all of your video files regardless of whether they were shot with a Flip or Kodak camera. (Even though the Flip camera files start as .avi it’s the wrong kind of .avi so you do need to convert them.)
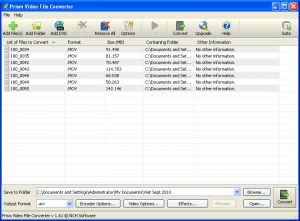
- From the desktop start up Prism Video File Converter.
- Drag and drop all the video files you want into the Prism window
- Select them all and choose Encoder options ? Video converter and change the setting to DV encoder PAL. Ignore all other settings and ‘Ok’ out of that menu.
- Click ‘Browse’ to choose where to save your files. Folders for each visit have been set up in My Documents ? My Videos ? White Paper Visits. Folder names are fairly self-explanatory.
- When you’ve chosen the right folder just press ‘Convert’. All your files will be saved as .avi files in your chosen folder ready for editing.
Creating start/end credits in PowerPoint
- Open a DH-branded PowerPoint template
- Click “Insert” then select “duplicate slide” – You’ll now have a slide for the start and end of the film
- Add text to the first slide, remembering to include the date
- On the second slide, remember to add the relevant DH web address (e.g. www.dh.gov.uk/liberatingthenhs), any other relevant digital channels (e.g. www.twitter.com/dhgovuk) and any relevant contact details.
- Once you’re satisfied that both slides contain the information you need, click “File” then “Save As”.
- In the window that appears, select the folder that you want to save the slides in (usually the folder same as your movie files) and from the “Save as type” drop-down menu select “JPEG File Interchange Format (*.jpg)” then click “Save”
- A notification box will appear – simply click the button marked “Every Slide” and your slides will be exported as JPGs that can be added to your movie.
Using Windows Movie Maker (AVI+MP3 > WMV and/or AVI)
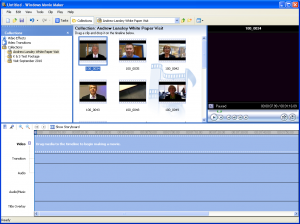
- Start up Windows Movie Maker (WMM)
- Click on the “New Collection” icon (which looks like a folder with a red asterisk on it):
3. Rename your collection to something relating to the film that you’ve been shooting by right-clicking and selecting “Rename”
4. Find your files in the folder where you saved them and drag and drop them all into the ‘collection’ space on the left of the WMM window. If they all put themselves into separate folders drag and drop them into one folder to make them easier to work on and delete all the other newly-created folders.
5. Drag and drop the JPGs that you created in PowerPoint into the ‘collection’ space. From here they can be dragged and dropped into the “Video” section of your movie’s ‘timeline’ – the blue section that runs across the bottom half of the WMM screen
6. Drag and drop all of your film clips and audio files (from Super ©) into the timeline in the order you want them to appear. They will appear as different lengths on the screen, which corresponds to the length of each clip. (You can use the magnifying glass icons to show more or less of your timeline.)
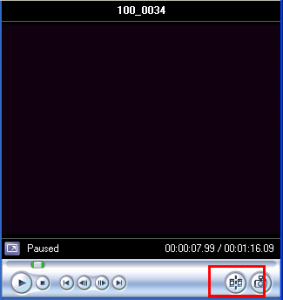
7. If you want to cut any of the clips, either play the clip or drag the blue vertical bar to the point where you want to cut. Click on the ‘split the clip into two…’ button to the right of the time bar (in the preview window). Delete the section you don’t want.
- If you accidentally put in a split you don’t want, either click ‘undo’ or you can just leave it in and it won’t show up in the film.
- You can cut each clip as many times as you want to take out sections from the start, end or middle.
- You can also drag and drop from the start or end of your clip to trim it
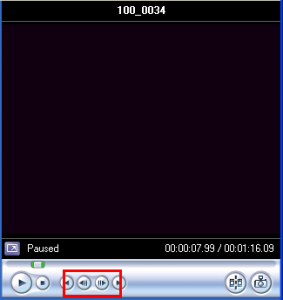
- You can then use the Next/Previous Frame buttons to find the exact place where you want to trim your clip
- If you want to increase or decrease the volume of a particular clip, press “CTRL” and “U” and adjust the volume slider. Replay the clip to check that the volume is sufficient and consistent with the other clips.
8. When you’ve got all your clips the right length and in the right order drag and drop your closing slide jpeg to the end of the video timeline
Finishing touches
To add name credits/captions:
- Select the first clip
- Go to ‘Tools’ at the top of the screen
- Choose ‘Titles and credits’
- Choose “Add title on the selected clip[...]”
- Write in the lower of the two boxes – press ‘enter’ a couple of times before you start, to lower the position of the text. Put the person’s name on one line and their job title and organisation on a second line.
- Choose ‘change font’ and reduce the size three times
- Check the colour of the font shows up against the background
- Align text to the left of the screen.
- Click ‘Done’.
- In the timeline bar drag the credit wider until it’s about 8 seconds long
Once you’ve created one set of titles, the easiest way to make sure they all have the same formatting is to copy and paste your first set onto each clip and just edit the text to match the speaker.
Fades, effects, transitions
To put it bluntly, the video transitions and effects built in to Windows Movie Maker are terrible – unless you want your video to look like an episode of ‘Top of the Pops’ from the 1970’s. The only effect that is worth using is that of the fade. This effect can be used on audio or video and is a nice way of moving from clip to clip, when each clip is of a different person, such as in the recent Ministerial visits. In an interview situation (where you’re shooting with two cameras, for instance), you’d want to cut quickly from interviewer to interviewee, so you would be advised not to use fades.
Using fades on audio can be useful where you have lots of background noise – provided that your clip has been trimmed close to where your subject has started and stopped speaking.
To add a fade to the audio or video portion of a clip, right-click on the clip where it appears in the horizontal “Audio” or “Video” bars in the timeline and then select “Fade in” or “Fade Out”.
A classic video structure would go:
(fade in) INTRO SLIDE (fade out) (fade in) VIDEO (fade out) (fade in) EXIT CLIP (fade out).
Here is a link to a good example of how a video should look:
Output from WMM (AVI and WMV settings)
- From the ‘File’ menu choose ‘Save movie file’.
- In the window that opens, make sure that “My Computer” (top option) is highlighted, then press “Next”
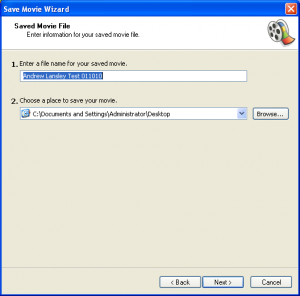
3. Name it with the folder name you’ve been working in (e.g. SofS South Central) and choose the location that you want to save the file to, then press “Next”
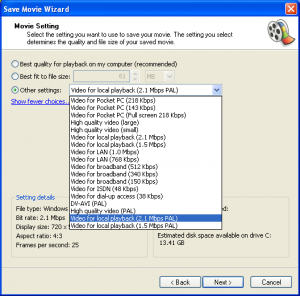
4. From the ‘Other settings’ drop-down menu, choose ‘Video for local playback (2.1 Mbps PAL)’ and save it once.
5. Once you’ve saved the movie file, remember to save your project (File > Save Project As…) otherwise you’ll have to re-edit from scratch, if the movie files need to be amended for any reason.
Uploading to YouTube
Login to the YouTube channel
- Click ‘Upload’ at the top of the screen
- Click ‘Select files from your computer’
- The privacy settings should usually be set to public, however if you don’t want the video to be publicly viewable, then set to private. Only people with the URL will be able to view the video.

1 comment
Comment by Jon Bryant posted on
I read your article with interest, having worked in mainstream video production for a long time. Some years ago I shifted away from my more commercial activities into the Social Care and Social Housing sectors. It occurred to me that sharing some of my very practical skills acquired over 3 decades might benefit charities and non profit organisations.
To that end I wrote a blog on the subject over the break, I hope that it compliments your guidance and expands the subject for those who, might want to do more than just record a “web cast” although I have offered tips and hints about lighting, composition and sound for those using a webcam.
Any feedback that would improve it would be much appreciated as these are tough times for charities so I am keen to contribute to the cause, without them we would all be in a very different place. I am currently using twitter to spread the word to charities.
http://tinyurl.com/bhepn9g
I have also invested a lot of personal time in creating testing and producing a tool to enhance communication for people with learning disabilities living in supported living. Not easy to distil a 43 page legally worded tenancy agreement in to an engaging, fun and memorable format. that's is re usable for any similar purpose.
http://tinyurl.com/b8twhhy
Kind regards
Jon Bryant